
Creating a custom diecast car is a complex process. It can involve over 100 parts and take up to 40 hours. This guide will help you craft your own miniature automotive masterpiece.
Making a diecast car blends artistry with engineering. You’ll select a model, choose a scale, and gather tools. The process requires careful planning and attention to detail.
Each step contributes to creating unique automotive art. From designing the body to adding final touches, you’ll see your vision come to life.
To start, learn about essential components and techniques. Large scale models offer bigger parts that are easier to handle. They also provide greater detail compared to smaller models1.
For an interactive experience, consider RC (remote controlled) model cars. They offer an exciting alternative to static models1.
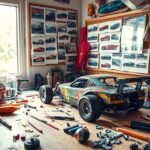
Set up a proper workspace before you begin. Consider bench size, lighting, and storage containers. A comfortable seat is important for long-term projects1.
Key Takeaways
- Custom diecast car creation requires patience and precision
- Selecting the right scale and model is crucial for your project
- A well-equipped workspace enhances efficiency and quality
- Large scale models offer easier handling and greater detail
- RC models provide an interactive alternative to static diecast cars
- Proper tool selection is essential for successful diecast car manufacturing
- Attention to detail in every step ensures a high-quality final product
Essential Materials and Tools for Diecast Car Manufacturing
Diecast car creation is a thrilling hobby requiring specific materials and tools. Let’s explore the essentials for bringing miniature automotive dreams to life.
Required Base Materials and Components
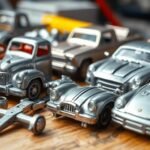
Gather metal alloys, molds, and paints for your diecast car project. Scale-model cars from the ’80s are now more affordable2.
For a budget-friendly approach, consider using die-cast cars like Matchbox or Hot Wheels as base models3.
Essential Tools and Equipment Setup
Diecast car tooling is vital for successful manufacturing. Your toolkit should include:
- Band saw and belt sander for shaping
- Fine-line paintbrushes for detailing
- Hobby knife for precision cutting
- Paint mixers for custom colors
- Tweezers for handling small parts
A comprehensive set ensures nothing goes to waste in your diecast car assembly process2.
Beginners can start with basic tools like scissors, a hobby knife, and super glue3.
Workshop Space Requirements and Organization
Create a well-lit workspace with a large bench for your diecast car assembly. Use storage containers and a comfortable chair for organization.
Try 3/4-inch pine wood for prototyping and acrylic paints for finishing. A power drill and wire mesh help with advanced customization3.
An organized workshop boosts efficiency and creativity in your diecast car manufacturing journey.
“A well-organized workspace is the foundation of successful diecast car creation.”
How to Make a Diecast Car From Scratch: Step-by-Step Process

Making your own diecast car is a fun project. This guide will show you how to create your miniature dream car. Let’s explore the steps to bring your vision to life.
Creating the Design and Template
Choose a car model and make a design template. Print photos of your chosen model for reference. Autodesk 123D Design is great for creating diecast car designs4.
Start with a 3D cube. Make it 65mm high, 200mm long, and 100mm wide4. This will be your starting point.
Preparing the Base Structure
For a wooden base, use 3/4in. pine. Cut it into 4-inch wide and 6-inch long pieces5. Attach your designs to the wood with spray adhesive5.
If 3D printing, use Autodesk 3D Print Utility and Makerware™ software. These tools will help prepare your parts4.
Molding and Assembly Techniques
For wooden models, use a band saw with a 1/4 in. blade. Cut out the car shape and sand off rough edges5. Glue the two halves together and let it set for an hour5.
Shape the model with a 1-inch belt sander5. For 3D printed models, make the car body 200mm long and 100mm wide4. Create wheel openings with specific sizes, like 16mm radius for rear wheels4.
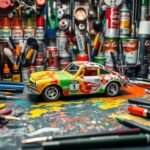
Painting and Finishing Methods
Use acrylic paint to color your diecast car. Apply paint with a fine-line brush for small details. Finish with polyurethane acrylic for a glossy look5.
Add decals or weathering effects for a unique touch. This will give your car its own personality.
| Step | Wooden Model | 3D Printed Model |
|---|---|---|
| Base Material | 3/4in. pine | 3D printing filament |
| Cutting Tool | Band saw (1/4 in. blade) | 3D printer |
| Shaping Method | 1-inch belt sander | Digital modeling |
| Finishing | Acrylic paint, polyurethane | Acrylic paint, polyurethane |
Now you can create your own unique diecast car. Keep practicing to improve your skills. Enjoy crafting and detailing your miniature automotive masterpiece.
Conclusion
Crafting a diecast car blends artistry with engineering. Quality tools and materials are essential. Costs vary based on project scale, from concept design to detailed engineering6.
Custom diecast creation involves several stages. Use precise millimeter measurements for accuracy. Design software like CorelDRAW or Adobe Illustrator helps with blueprints7.
Prototype development can cost between £2,000 and £10,000. Budget planning is crucial6.
Die-casting moulds are a significant investment, ranging from £20,000 to £50,000+. Material costs vary for each model type. Resin models cost £2 to £5, while die-cast metal models range from £3 to £106.
For decal printing, consider a specialized printer like the iColor 560. It produces professional results7.
This hobby can evolve into a passion or business venture. With dedication, you can bring miniature automotive visions to life. Join the fascinating world of custom diecast cars.
FAQ
What materials do I need to make a diecast car from scratch?
How do I create a design template for my custom diecast car?
What’s the process for molding and assembling a diecast car?
How do I paint and finish my diecast car?
What kind of workspace do I need for diecast car manufacturing?
Can I use 3D printing in diecast car production?
How long does it typically take to make a diecast car from scratch?
What are some common challenges in diecast car manufacturing?
Source Links
- How to Make Model Cars – DeAgostini Blog – https://blog.deagostini.com/2019/03/how-to-make-model-cars/
- Everything you need to make your scale-model car look as realistic as possible – https://www.topgear.com.ph/columns/rust-n-pieces/everything-you-need-to-make-your-scale-model-car-look-as-realistic-as-possible-a00040-20160707
- Gaslands car tutorial for beginner – A Gentlemanly Sport – https://www.agentlemanlysport.com/gaslands-car-tutorial-for-beginner/
- Design a Custom Model Car – https://www.instructables.com/Design-a-Custom-Model-Car/
- Make Your Own Model Cars and Save a Bundle! – https://www.instructables.com/Make-Your-Own-Model-Cars-and-Save-A-Bundle/
- The Real Cost of Producing a New Model Car: A Comprehensive Breakdown – https://diecastmodelcentre.co.uk/blogs/news/the-real-cost-of-producing-a-new-model-car-a-comprehensive-breakdown?srsltid=AfmBOoqf4vAzuwVPSn34XAu3DKep1BK691WONQD1soeSfmB-ToxJfTzB
- A Guide to Master Diecast Car Customization – https://lasertransfersupplies.com/blogs/articles/guide-to-master-diecast-car-customization

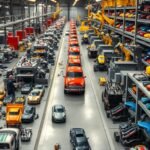
Interesting read but isnt 3D printing a more efficient method for diecast car manufacturing these days? Just a thought!
Interesting guide, but why wasnt the cost of making a DIY diecast car compared to buying one directly discussed?
Perhaps cost isnt the primary concern when it comes to the joy of DIY. Ever thought about that?