How to Change Wheels on Diecast Cars – DIY Guide
Affiliate links — we may earn a commission
Ever thought of making your diecast car collection stand out? This DIY guide will teach you how to change wheels on your favorite models. You’ll learn how to customize your 1:64-scale cars, from Hot Wheels to Maisto and Greenlight. It’s a fun way to show off your car love.
Key Takeaways
- Changing wheels on diecast cars is a popular way to customize and enhance the appearance of collectible models.
- This DIY guide covers the process of replacing wheels on various diecast car brands, including Hot Wheels, Maisto, and Greenlight.
- The project involves disassembling the car, removing old wheels, and installing new ones, which can significantly improve the visual appeal of diecast cars.
- Diecast car wheel replacement can turn cheap toys into desk-worthy collectibles.
- The DIY guide provides a step-by-step process for changing wheels on diecast cars, emphasizing the need to split the car apart and remove rivets.
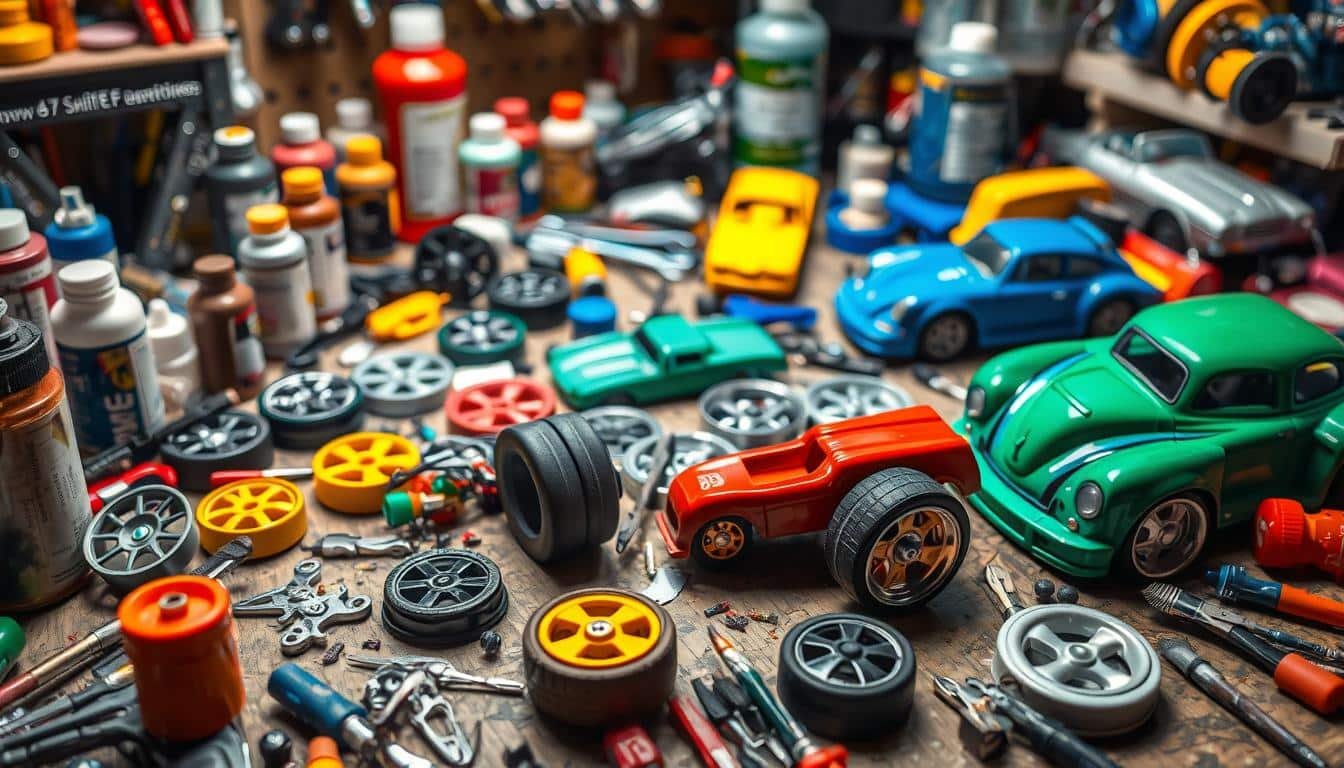
Essential Tools and Materials for Diecast Wheel Replacement
Changing the wheels on your diecast vehicles needs the right tools and materials. As a diecast enthusiast, you’ll need a few key items for a smooth wheel replacement. Let’s look at the must-have tools and materials for your diecast restoration projects.
Required Basic Tools
The basic tools needed for diecast wheel replacement include:
- Rotary power tool or drill press
- Drill bits (3mm or 1/8″ for removing rivets)
- Utility knife
- Putty knife
- Pliers and wire cutters
These tools help you disassemble the diecast car, remove the old wheels, and get the chassis ready for new wheels.
Wheel Types and Selection
There are many wheel options to choose from. You can go for aftermarket “Real Riders” wheels or custom replicas of popular designs like the iconic Volk TE37s. These upgrades can change the look and performance of your diecast cars, taking your customization to the next level.
Safety Equipment
Safety is crucial when working on diecast vehicles. Always wear protective eyewear and gloves to protect your eyes and hands during the wheel replacement. Some enthusiasts even make custom tools, like a modified flathead screwdriver, to improve precision and avoid damage.
With the right tools, materials, and safety precautions, you’ll be ready to restore and customize your diecast vehicles with confidence. Remember, paying attention to detail and having a steady hand are essential for successful diecast wheel replacement.
How to Change Wheels on Diecast Cars: Step-by-Step Process

Customizing your diecast car hobby is exciting and rewarding. Changing the wheels is a popular modification. It can enhance the look or achieve a specific style. Here’s a step-by-step guide to help you do it yourself.
- Disassemble the Car: Start by carefully disassembling the diecast car. This involves drilling out rivets or removing screws that hold the body and chassis together.
- Separate the Body and Chassis: Gently separate the car’s body from the chassis. Make sure you don’t damage any delicate parts.
- Remove the Old Wheels: To remove the existing wheels, you may need to cut or pry off any axle locks or retainers. Be careful with fragile wheels. Use a modified screwdriver tool to pry them off.
- Install the New Wheels: Attach the new wheels to the axles with a small amount of crazy glue or epoxy. This keeps the wheels secure during play or display.
- Optional: Customization: If you want, you can strip the old paint, repaint the body, and add details or modifications before reassembling it.
- Reassemble the Car: Once the new wheels are in place and any customization is done, carefully reassemble the car. Use glue or small screws to secure the body to the chassis, especially if you drilled out rivets.
Different diecast car brands, like Hot Wheels, Greenlight, and M2 Machines, may need different techniques or tools for wheel replacement. Make sure to research the specific requirements for your brand and model. This ensures a smooth and successful wheel-changing experience.
“Customizing your diecast cars can be a deeply rewarding hobby, allowing you to express your creativity and transform these miniature marvels into true masterpieces.”
The key to a successful diecast car wheel replacement is patience, attention to detail, and a willingness to experiment. Share your modification process through build journals, photos, or videos. This can inspire and encourage other diecast car hobbyists to explore customization.
Conclusion
Changing wheels on diecast cars is a fun hobby that lets you make your collection special. It can make your models look unique and personal. Even beginners can get great results with the right tools and a bit of practice.
Take your time and be patient with the details. Don’t be shy to try out different diecast model wheels and diecast car modification ideas. Share your work with others and keep learning new ways to customize your models.
Personalizing your diecast cars can make them even more enjoyable. It’s a chance to show off your creativity and turn them into unique pieces of art. Let your imagination run wild as you make your models stand out.
What tools are needed to change wheels on diecast cars?
What types of wheels can I use to customize diecast cars?
How do I disassemble a diecast car to replace the wheels?
Can I repaint and add details to the diecast car body during the wheel replacement process?
Are there any special techniques required for different diecast car brands?
Source Links
- Swapping Rims on a Hot Wheels Car Turns a Cheap Toy Into Something More – https://www.thedrive.com/guides-and-gear/swapping-rims-on-a-hot-wheels-car-turns-a-cheap-toy-into-something-more
- Customize or Refurbish Hot Wheels! – https://www.instructables.com/Customize-or-Refurbish-Hot-Wheels/
- Replacing Wood Spokes On Model T – https://www.mtfca.com/phpBB3/viewtopic.php?t=7212
- How to swap wheels on Hot Wheels or Matchbox – workshop 101 – https://jasminesgarage.wordpress.com/2016/05/14/how-to-swap-wheels-on-hot-wheels-or-matchbox-workshop-101/
- How to make your own replacement axles – https://www.redlinederby.com/topic/how-to-make-your-own-replacement-axles/3315
- A Wheel Swap Guide for Diecast Model Cars – https://livecarmodel.com/blog/a-wheel-swap-guide-for-diecast-model-cars/?srsltid=AfmBOorQH-EDljMq96tirCQKUkIU0DWjCKokDWY48VCei8Ke6yvLxSEw
- Removing/refiitting wheels – https://www.diecastrallymodels.com/t3118-removing-refiitting-wheels
- Beginner’s guide to modifying cars – https://www.redlinederby.com/topic/beginners-guide-to-modifying-cars/3311
- Why Upgrading Wheels and Tires? – https://www.forgelitewheels.com/blog-posts/4-benefits-of-upgrading-wheels-and-tires-on-your-car
- Finding the Extraordinary Within the Ordinary – https://ecrp.illinois.edu/v17n1/cowan.html
- CC Capsule: The Wheels Of Change – Curbside Classic – https://www.curbsideclassic.com/uncategorized/cc-capsule-the-wheels-of-change/
Mike Callahan
Contributing writer covering diecast cars and figurines.


Interesting DIY guide. Just curious, wouldnt different diecast car brands require specific wheel types and tools?
Great article! But dont you think a video tutorial would make the wheel-changing process on diecast cars much clearer? Just a thought.
Isnt it a bit too much to DIY? Surely buying a new diecast car would be more cost-effective and less hassle!